All about Smoothies!

Yum-Yum!! :)

Yum-Yum!! 🙂

I have always read in magazines that smoothies are very healthy and it is more nutritional to drink than juices and can act as a refreshing snack as it is packed with vitamins. I have never been to adventurous with my smoothies but I have signed up to the Emerald Street e-newsletter and it was all on smoothies and I will probably try the Sweet Strawberries and Energy Booster recipes. I don’t think I can stomach a smoothie which is made of vegetables like the Enzyme-Rich recipe, it doesn’t sound too appealing!!

All the ingredients ready for blending!

All the ingredients ready for blending!

Today, I made a smoothie with 1 banana, a few strawberries and a handful of blueberries. I added 1 cup of milk, 1 teaspoon of vanilla extract and a few ice cubes and blended them altogether. It was delicious! Great for the mornings! 🙂

Smoothies recipes from the Emerald e-newsletter:

SWEET STRAWBERRIES
We drank this at The Breakfast Club in Soho, London and loved its sweet and filling ingredients. They shared the recipe: in a blender, mix ½ cup frozen strawberries, 1 banana, ⅓ cup of oats, 1 tbsp honey, 2 tbsp yoghurt, 20cl whole milk. Whizz until smooth.

NOSH PURPLE SMOOTHIE
Full of vitamins B, E and C, plus protein and fibre, this smoothie is from Nosh Detox founder Geeta Sidhu-Robb. Blend ½ cup of blackcurrants, ½ cup of blueberries, ½ cup of raspberries, one 2.5g sachet of Nosh Superfood, 2 tsp of pea protein and 1 banana with one glass of spring water.

ENZYME-RICH
In Supercharged Food (Murdoch Books, £14.99), Lee Holmes suggests this smoothie for flushing out toxins. Blend 350g spinach, 1 handful mint, 1 handful parsley, 1 tbsp lemon juice, 1 Lebanese cucumber, a few lettuce leaves, 4 celery stalks, 2-3 cm piece of peeled ginger, then pour over ice.

ENERGY BOOSTER
Nutritionist Madeleine Shaw recommends this berry smoothie, which contains high levels of antioxidants, potassium and essential fatty acids. In a blender, mix 200ml of coconut water, half an avocado, 100g of frozen mixed berries, 1 tsp of cinnamon and 1 tsp of chia seeds.

The secret of perfect macarons

On Cafe

On Cafe

At the Hampton Court’s Food Festival back in May, we came across a stall selling beautiful macarons and mini desserts in a shot glass. I quite like macarons as the there are different textures and they look very dainty. I have made them in the past, first time, they were fine but second time, they were a bit of a disaster! So, it is really a hit and miss with the method! I picked up a flyer and she is actually the owner of On Cafe patisserie and cookery school in South London – Loretta Liu. After tasting her delicious macarons, I wanted to sign up for her class to try to improve my technique! 🙂

On Cookery Class

On Cookery Class

I went to my class last Thursday, I must say it was a mission to get to, I had to change 3 x tube/train to get to Wandsworth Road overground station and it was hidden in a mew where you wouldn’t expect to find a cookery school! The class started at 6.30pm and finished around 10pm, luckily my hubby picked us up as i didn’t fancy the journey home on public transport and even just walking out from there because it was quite dark and deserted! It was a pretty popular class as there was probably over 20 of us in the class room. At first, Loretta gave a demonstration on how to make macarons using a French Meringue basic recipe and then we were left to do this ourselves.

Egg whites and caster sugar whisked - ready

Egg whites and caster sugar whisked – ready

All the ingredients were measured already so all we needed to do was to sieve the icing sugar and mix everything together! Sounds easy but hard to do! She made each step looks so simple and easy!!! But in fact, it is actually quite difficult, she would show you when to add the caster sugar to the eggs (being whisked by a Kenwood mixer) as you had to get the timing right. She couldn’t say how long but her advice is practice makes perfect and you will get to know this by seeing the texture of the egg whites… It is all about trusting your instincts and testing your recipe!!!

Ready to fold in

Ready to fold in

I had a hard time folding in the egg whites to the ground almond and icing sugar as it is hard work!!! I have always relied on my kitchen aid but to fold in manually takes awhile and your arm gets quite tired doing the same movement! She mentioned that I have slightly over mixed my mixture as I needed to fold in more quicker! It was good that she was pointing out to people of where they were going wrong and basic tips to look out for.

All mixed up!

All mixed up!

All pipped and ready to bake. Unfortunately, i forgot to take the 'after' photo!

All pipped and ready to bake. Unfortunately, i forgot to take the ‘after’ photo!

I was pleased with my pipping skills as you can definitely see that they were round and not running into each other! 🙂

Whilst we waited for the skins to form, she gave us a talk about the choosing the right equipment to use for making macarons and there was opportunities to ask questions about the macaron techniques. Her assistant puts our macarons trays in the oven to bake and she showed us how to make chocolate ganache and caramel chocolat dulcey ganache. I have never made caramel before so it was interesting to see how this was made. We then had time for some light refreshments and a bite to eat as it was an evening class so I was pretty hungry! 🙂

All the trays

All the trays

Once the macarons were baked, Loretta then gave a critique of each tray to point out what went well and what went wrong! Luckily, my tray turned out pretty good and I recieved positive comments, only drawback was that the mixture was slightly over mixed so some of the macarons stuck to the silpat, but apart from that, I was really happy with my macarons! We then got to take home the fillings as we should leave the macarons in the fridge to firm up as they were still quite soft. Once filled, they were so yummy and moorish to eat!!

I really enjoyed this class, I went with one with of my friend, Dimpy, it was nice to share this experience as sometimes it is quite daunting to go by yourself!!! I feel that I have definitely learnt something and have a greater understanding of the techniques. On the website, the price says £80 but when you come to pay for this, it is only £39 which is a bargain for a 3 hours lesson! 🙂

Start pack included: a long exoglass spatula, pipping bags, round nozzle, silpat and template. Also, I brought some vanilla powder as well which is to flavour the macarons and you can use it in baking!

Start pack included: a long exoglass spatula, pipping bags, round nozzle, silpat and template.

At the end of the lesson, there is a chance to buy things from her display such as a Macaron starter kit, different flavoured oils, macarons etc and if you buy on the day, you will get a 5% discount. I couldn’t resist and brought myself the starter kit and vanilla powder as you can use this to flavour the macarons but also use it for baking other desserts! 🙂 For more information, visit her website – www.oncafe.co.uk. I would highly recommend this class to everybody who loves macarons! 🙂

All baked! :)

All baked! 🙂

All filled and ready to eat! Yum! :)

All filled and ready to eat! Yum! 🙂

Foodies FEAST at Battersea Park!

Foodies FEAST - Battersea Park

Foodies FEAST – Battersea Park

Today, we went to the Foodies FEAST festival at Battersea Park! We got there relatively early as it is nice to walk around when it is not crowded and you can spend your time looking at all the stalls and of course grab any free tasters!!! 🙂 They hold the Foodies Festival all over the country, for more information on the locations, click here. Last one I went to was at Hampton Courts!

For lunch, I went to Gaucho BBQ and got a rib eye steak burger for £7. I did think it was quite pricey as you don’t get anything else with it, no salad or chips, just pure pieces of meat in a bun! 🙂 However, it was pretty filling and very tasty!

Rib Eye burger! :)

Rib Eye burger! 🙂

Gaucho BBQ stand

Gaucho BBQ stand

Dan's lunch! :)

Dan’s lunch! 🙂

Dan went to the Bunnychow stand for his lunch, it had meatballs in a spicy tomatoes sauce contained in a bread. Very filling with the bread! 🙂

Bunnychow stand!

Bunnychow stand!

Vintage Feast Stall, such cute decor! :)

Vintage Feast Stall, such cute decor! 🙂

After lunch, we made our way to the Vintage Feast stall where they made home-made cakes and served tea in cute vintage designed teacups!! 🙂 The cake slice is massive and well worth £4 which includes a free refill of tea!

Yum! Delicious victoria sponge cake with tea!

Yum! Delicious victoria sponge cake with tea!

I made a few purchases on the day! 🙂 I love buying sweet treats! 🙂

Natas from the Delicias stall! I love these natas! So sweet and creamy! :)

Natas from the Delicias stall! I love these natas! So sweet and creamy! 🙂

Just Beautiful Cakes Stand

Just Beautiful Cakes Stand

Red velvet cake in a pot!

Red velvet cake in a pot! I love this presentation as you can always screw the lid back on if you can’t eat it all in one go! 🙂

Stoats Stall

Stoats Stall

I also visited a stand called ‘Stoats’ specialising in porridge oats and snack bars from Edinburgh. I was tasting the samples and went back for more! They told me I can get a ‘Goodies Bag’ for £10 and boy, you do get a lot!!! 🙂 Such a bargain! 🙂 And you can buy their products online from here.

Bargain!! :)

Bargain for £10!! 2 x boxes of porridge, 3 x pots of porridge and 3 x porridge oat bars! Yum! 🙂

Jamie Oliver's Magazine Stand

Jamie Oliver’s Magazine Stand

We also visited the Jamie Oliver’s magazine stand as they had a special deal for £25 to subscribe to his magazine. I have actually never seen his magazine before and was curious what you get for this deal! If you subscribe on the day, you will get 10 magazines every year and also you will get a goody bag which includes the Jamie Oliver’s Italian recipe book worth £16.99!! So, my hubby kindly signed me up to this deal as he will probably benefit the most as I will be doing the cooking!!! 🙂
Jamie Oliver's goodie bag!

Jamie Oliver’s goody bag! Includes 1 set of salad servers, free issue of the mag, cookbook, recipe yearbook and a packet of basil seeds! 🙂
Purbeck ice cream stand - i had the Berry and clotted cream which was so delicious! :)

Purbeck ice cream stand

As the sun was coming out, i couldn’t help but buy an ice cream to munch on! 🙂 I had the berry and clotted cream ice cream which so creamy and yummy! 🙂
A lovely treat to finish the day at the Foodies Festival! 🙂

Foodies Feast - Battersea Park

Foodies Feast – Battersea Park

Foodies Feast - Battersea Park

Foodies Feast – Battersea Park

Bake the Stylist Front Cover!

Stylist Mag competition

Stylist Mag competition

I picked up a Stylist magazine a couple of weeks ago and they have got a competition to bake an original version of their front cover for an upcoming issue. This is timed to coincide with the return of The Great British Bake Off. I love this programme!! 🙂 It is opened to all amateur bakers and you can make your design out of any baked goods: cupcakes, pastry, bread or a combination of all. The theme is ‘things that make you happy’ and the deadline is the 7th August.

I really wanted to enter this competition but I wasn’t sure what to bake according to the theme! It can be a place, person or concept. I thought it would be too cheesy to use the theme of love as everybody would do this. So, I had to really think hard of what I was going to bake. Then, I had the inspiration of having a collage of things that makes me happy and putting them into one shot!!!

Love, Family, Friends and Baking are all important elements in my life that makes me happy! :)

Love, Family, Friends and Baking are all important elements in my life that makes me happy! 🙂

I spent my last weekend baking for this and things that me happy are a combination of things: Love, Friends, Family and Baking! 🙂 I must say, it did take longer than I thought and especially with icing biscuits. I have never iced biscuits before, from the recipe book, it looks so simple but when actually doing this, it is quite messy and the piping just went all over the place with the royal icing! I definitely need more practicing and to have more patient with icing biscuits! I baked heart-shaped biscuits to represent love, cupcakes to represent friends, a raspberry torte cake for family and a pistachio loaf cake for Baking.

I wouldn’t say my entry would have the best presentation as such as I had a terrible time with icing the biscuits and I couldn’t find a great backdrop to the picture but at least I had fun in baking everything  and it kept me occupied!!!

In the end, I took the pistachio loaf cake to my hubby’s family as my mother in law loves this cake! I took the cupcakes and raspberry torte cake to work and I left the biscuits at home for us to eat! It just looked so ugly and I didn’t want anyone else to have them! My hubby said they looked pretty and just have a ‘unique’ look to it so I think he was trying to comfort me! 🙂

Heart-shaped biscuits - it is important to have love in your relationship and I love my hubby! :)

Heart-shaped biscuits – it is important to have love in your relationship and I love my hubby! 🙂

Raspberry torte cake - I love my families! :)

Raspberry torte cake – I love my families! 🙂

Pistachio Loaf Cake - I love to bake! :)

Pistachio Loaf Cake – I love to bake! 🙂

The Stylist Winner! :)

The Stylist Winner! 🙂

The front cover was published on the 28th August and here is the winner! I really love it! I think we had similar idea and her pipping skills is amazing! Well done to Pamela Giles! 🙂


Jo Wheatley’s Baking Competition – August

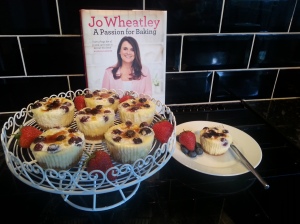
My entry! :)

My entry! 🙂

Last week, I entered Jo Wheatley’s baking competition for August, it was on cheesecakes! I am not really a fan of cheesecakes, I like cakes more but my hubby and his family loves cheesecakes!!! 🙂

For Jo’s competition, you can use recipes from either of her 2 books, A Passion for Baking or Home Baking which you can buy exclusively from Sainsburys. My hubby surprised me last month by buying me her new book so I was really pleased!!! 🙂 I can’t wait to try some of her recipes as it includes main meals and not just strictly to baking!

So, I decided to make the ‘Individual Blueberry Brulee Cheesecakes’ from her first book as you will need to use a kitchen blow torch to caramelize the sugar! I brought mine earlier on this year but never used it and thought this would be a good opportunity to try this out!! 🙂

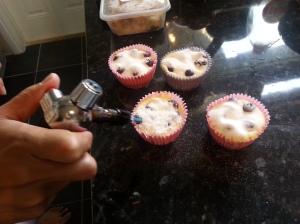
Do not use a kitchen blow torch with the paper cases

Do not use a kitchen blow torch with the paper cases

Tips: Firstly, never use a blow torch whilst the dessert is still in the paper case as it will burn!!! 🙂 Secondly, I think I will need to watch some you tube videos of people using the blow torch as I was totally clueless!!! My sugar didn’t all melt as I think I didn’t put it over the cheesecakes long enough because I was scared of burning them all!!! 🙂

The cheesecakes were lovely, light and had a creamy texture, I was really pleased. I did submit my entry but unfortunately didn’t win but I got to make a new dessert and tried out using the blow torch so I am pleased! 🙂

Here’s the recipe, it makes 8 but I think you have enough mixture for 9:

  • 55g unsalted butter
  • 7 digestive biscuits
  • 300g full fat cream cheese like Philadelphia
  • 100ml Greek yoghurt
  • 100g caster sugar
  • 2 large eggs
  • 1 tsp vanilla extract
  • 100g blueberries
  • To serve – 8 – 9 tsp of caster sugar

Method:

  1. Preheat the oven to GM4 and line a cupcake tin with your cases
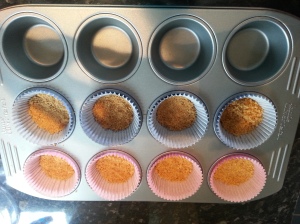
  2. Melt 30g of the butter in a small pan or microwave. Crush the digestive biscuits in a food processor and tip into a bowl. Add the melted butter to combine. Spoon the crumbs into the cases and press into the bases to form a crust. Bake for 5 minutes and then leave to cool
  3. Beat together the cream cheese, Greek yoghurt, caster sugar, eggs and vanilla extract. Melt the remaining butter and add to the mixture and stir until thoroughly combined
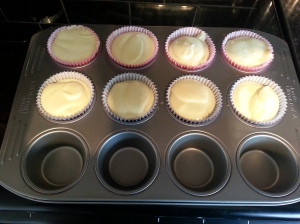
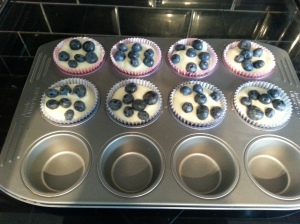
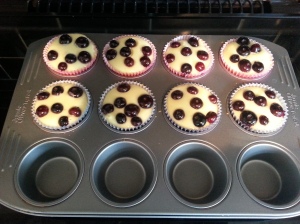
  4. Spoon the mixture evenly between the cases, I used an ice cream scooper for this process. Add the blueberries on top and bake for 25 minutes.
  5. Leave the cheesecakes to cool before chilling in the fridge for at least 2 hours
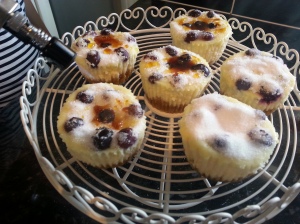
  6. Just before serving, sprinkle each cheesecake with a teaspoon of caster sugar and caramelize with a blow torch. Leave for a couple of minutes for the caramel to set and then serve straight away.

I think this is really nice dessert when you have friends or family coming round for dinner as it is not too over indulgent! 🙂

Biscuit base

Biscuit base

Cream cheese mixture

Cream cheese mixture

Before

Before

After - All Baked

After – All Baked

Using the kitchen blow torch!

Using the kitchen blow torch! Just before serving!


elBulli: Ferran Adrià and The Art of Food

Hi, I just wanted to tell you that about elBulli: Ferran Adrià and The Art of Food’s exhibition at Somerset House this Summer. I have brought my tickets and I can’t wait to see this!!! 🙂 Hopefully i can take some photos to share with you guys! 🙂

A global icon of gastronomy, Ferran Adrià, and the restaurant he built to become the world’s best, elBulli. In partnership with Estrella Damm, elBulli: Ferran Adrià and The Art of Food is the world’s first exhibition dedicated to a chef and his restaurant. The retrospective will showcase the art of cuisine and cuisine as art by taking a behind-the-scenes look at the legendary laboratory and kitchen of the internationally renowned restaurant, which delighted diners in Cala Montjoi, a small picturesque bay on the Catalan coast near Roses, for over 50 years.

Charting the evolution of elBulli, the exhibition will feature an in-depth, multimedia display of each of the essential ingredients that make up the culinary creative mastermind of Ferran Adrià and his team: research (handwritten notes and hand-drawn sketches); preparation (plasticine models, which were made for all the dishes served as a means for quality control of colour, portion size and position on the plate, and the specially-designed utensils used); presentation (original tasting menus, cutlery laid on the tables and salivating shots of the creations taken from the catalogue to be published by Phaidon next year), and plaudits (original restaurant reviews and other press clippings).  Combined with archive footage of the chefs and clientele, the exhibition’s ephemera are testament to Adrià’s abundant talent, genius and ambition.

In total, the elBulli team invented 1,846 dishes and in doing so, they led the culinary revolution which has inspired and influenced a generation of chefs including Heston Blumenthal, René Redzepi, Joan Roca, Andoni Aduriz, Massimo Bottura and Grant Achatz.  Under Adrià’s leadership and creative direction, elBulli was voted the world’s best restaurant five times by Restaurant magazine and the restaurant received over 2 million reservation enquiries for each summer season that it was open.

When and Where?
elBulli: Ferran Adrià and The Art of Food – 5 July–29 September 2013, 10.00-18.00, until 21.00 Thursdays, Somerset House, Embankment Galleries West, South Wing.